
Generator
Your first pattern: printing and gluing
How to print a pattern from the generator on a home printer at full size, check the scale and glue the sheets together.
The generator draws the pattern at full size and divides it into A4 sheets. They are printed on an ordinary printer and glued together along the frames. A dress in size 40 with sleeves takes 22 sheets; a straight skirt in the same size takes 12.
The most important thing in this lesson is the scale. Almost any viewer program shrinks the page a little by default so that it fits on the sheet. You cannot see this by eye, but in the finished garment it adds up to several centimetres around the bust or hips. So before printing all the sheets, print the first one and measure the corner ruler on it.
The printing steps are shown for Windows.
Build the pattern
- Open the generator, choose a garment and a size. If you are sewing to your own measurements, enter them in the form: how to take them is explained in the lesson “Taking measurements”.
- Check that the “Block adjustment” checkbox is ticked (“Block adjustment + sleeve” for garments with a sleeve). Pieces are built only with it on; without it the print item is not available.
- Click “Build pattern”.
The “Pieces for printing” window
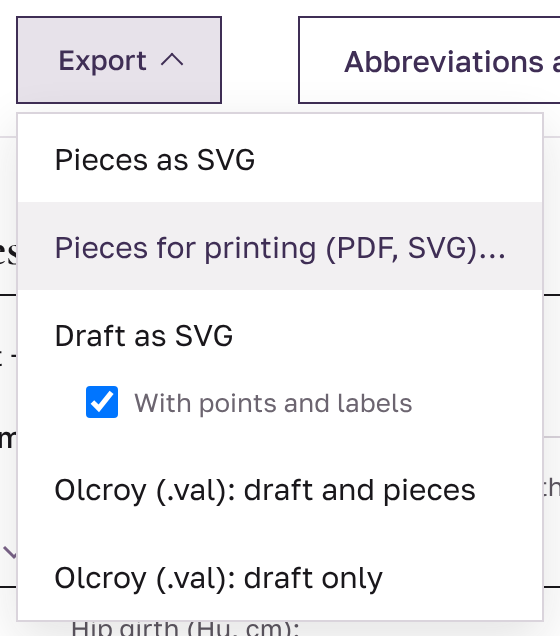
Open the “Export” menu above the drawing and choose “Pieces for printing (PDF, SVG)…”.
The window with the settings opens. Nothing needs to be changed for a home printer:
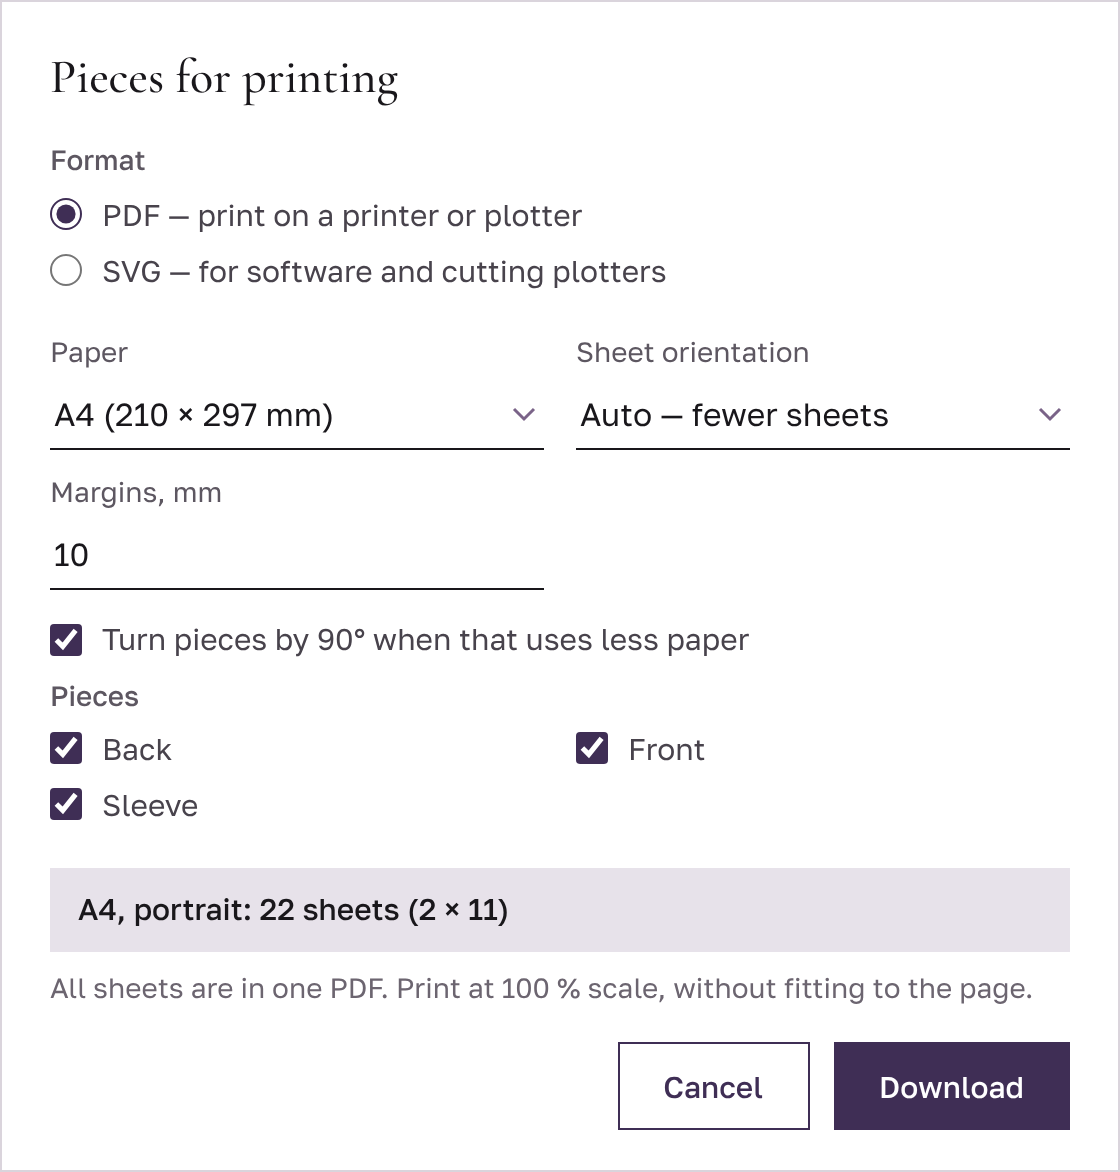
- Format — PDF. All the sheets end up in one file. SVG is for programs and cutting plotters.
- Paper — A4. If your printer takes A3, choose A3: there will be almost half as many sheets.
- Orientation — “Auto”. The generator chooses how to lay each sheet so that fewer sheets are needed.
- Margins — 10 mm. This is the edge of the sheet that the printer does not print; the gluing frame runs along it. If the frame is cut off on the printout, increase the margins to 12–15 mm.
- Turn pieces by 90° — leave it on: this uses less paper.
- Pieces — untick any pieces you do not need to print.
Below the settings the generator shows how many sheets there will be. Click “Download”: the PDF is saved to the “Downloads” folder.
Print at 100% scale
First print only the first sheet: it has the corner ruler on it.
Open the PDF by double-clicking it. On Windows 10 and 11 it usually opens in the Microsoft Edge browser. Press Ctrl + P.
In Microsoft Edge:
- Pages — choose the option with page numbers and type
1. - Open “More settings” and find “Scale (%)”. Choose “Actual size”. The “Fit to printable area” option is selected by default and makes the pattern smaller.
- Click “Print”.
In another PDF viewer, look for the same item in the print window: “Actual size” or 100% scale. Options such as “Fit to page” or “Fit” make the pattern smaller.
Check the ruler
On the first sheet, at the top left, there is a red corner ruler (black on a black-and-white printer): two 15 cm scales from one corner, to the right and down, with a tick every 1 cm and the label “15 × 15 cm”. Inside the corner are the name of the garment, the size, the seam allowances and the same reminder about scale.
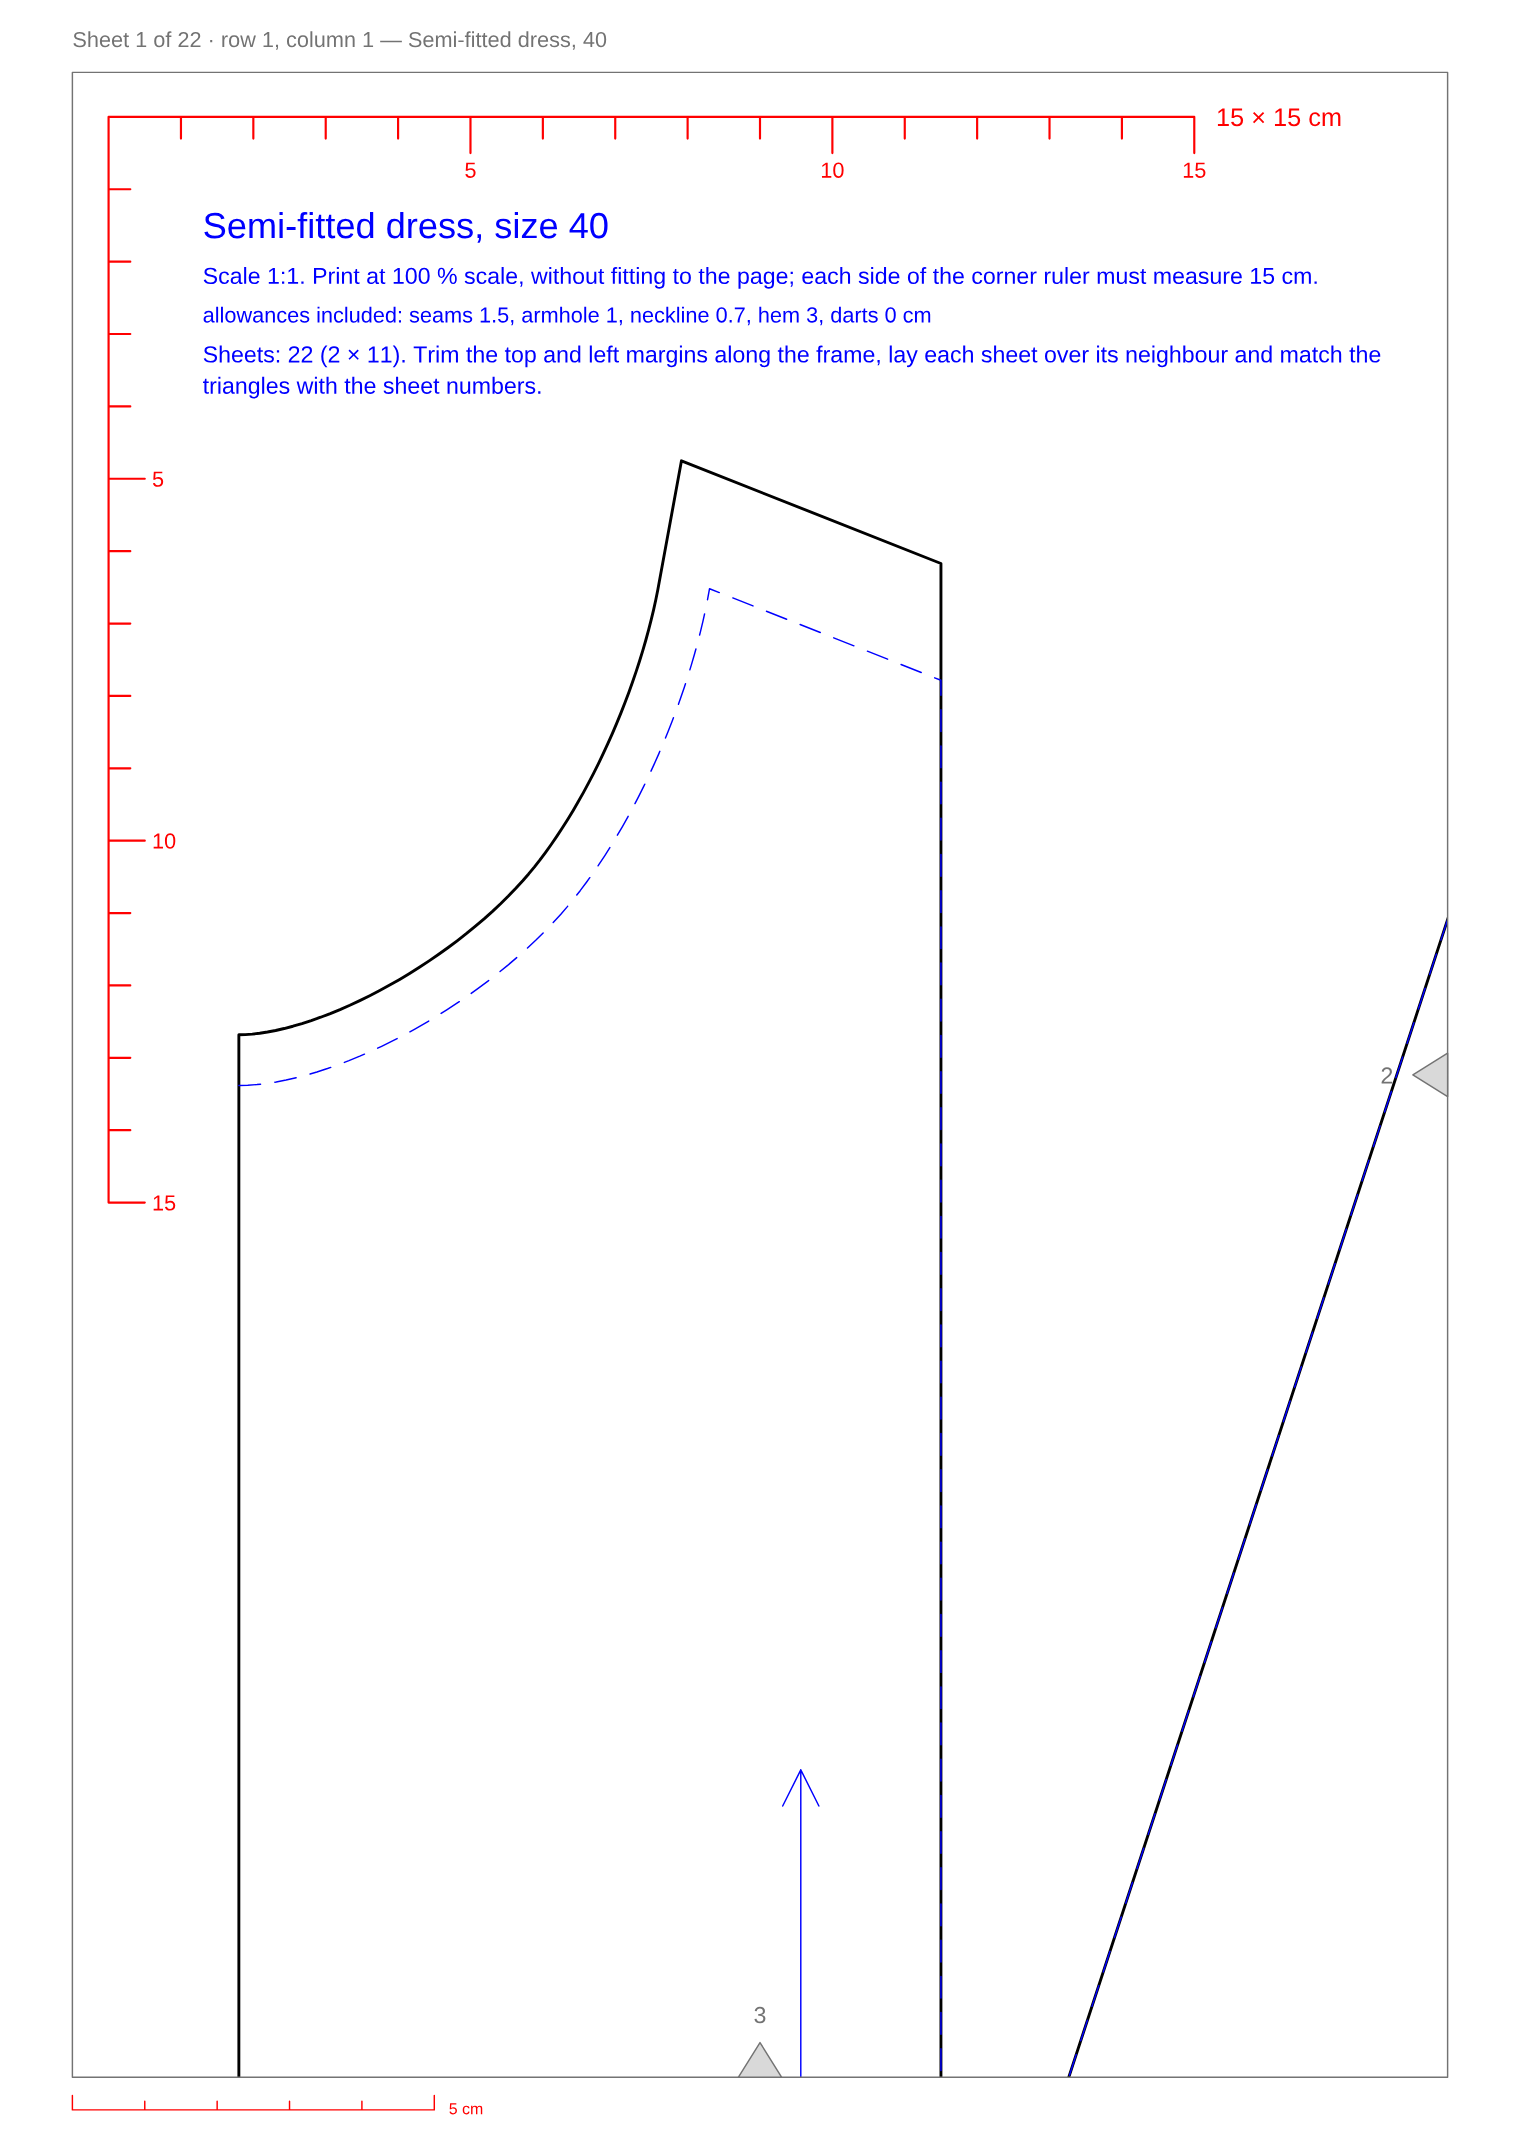
Place your own ruler along both scales, from the corner to the last tick labelled 15. Each scale must be exactly 150 mm.
- 150 mm — all correct; print the other sheets with the same settings.
- 145–149 mm — the printer has shrunk the page. Find fit-to-size in the print window or in the printer settings.
- Scales of different lengths — the printer is feeding the paper unevenly. Try a different pack of paper or feed the sheets one at a time.
The 5 cm scale bar is at the bottom of every sheet. Measure it on a couple of sheets from the middle of the stack: the printer may drift in the middle of printing.
Glue the sheets
The sheets are numbered by rows: from left to right, then the next row. The sheet number, row and column are printed above the frame.
The generator does not print empty sheets. The other sheets keep their numbers, so the stack may have no sheet 7, for example: leave its place free when you lay the sheets out. An edge next to a skipped sheet has no triangle. The “Pieces for printing” window lists the skipped numbers next to the sheet count.
- Lay the sheets out by number on the floor or a large table.
- Trim the margins at the top and on the left of each sheet — exactly along the frame. The top margin of the first-row sheets and the left margin of the first-column sheets can be left as they are.
- Lay each sheet on its neighbour: the trimmed edge goes on the frame of the neighbouring sheet. The grey triangles with the sheet numbers form a diamond, and the lines of the pieces continue without a step.
- Fix the join with short strips of sticky tape. It is convenient to glue each row first and then the rows together.
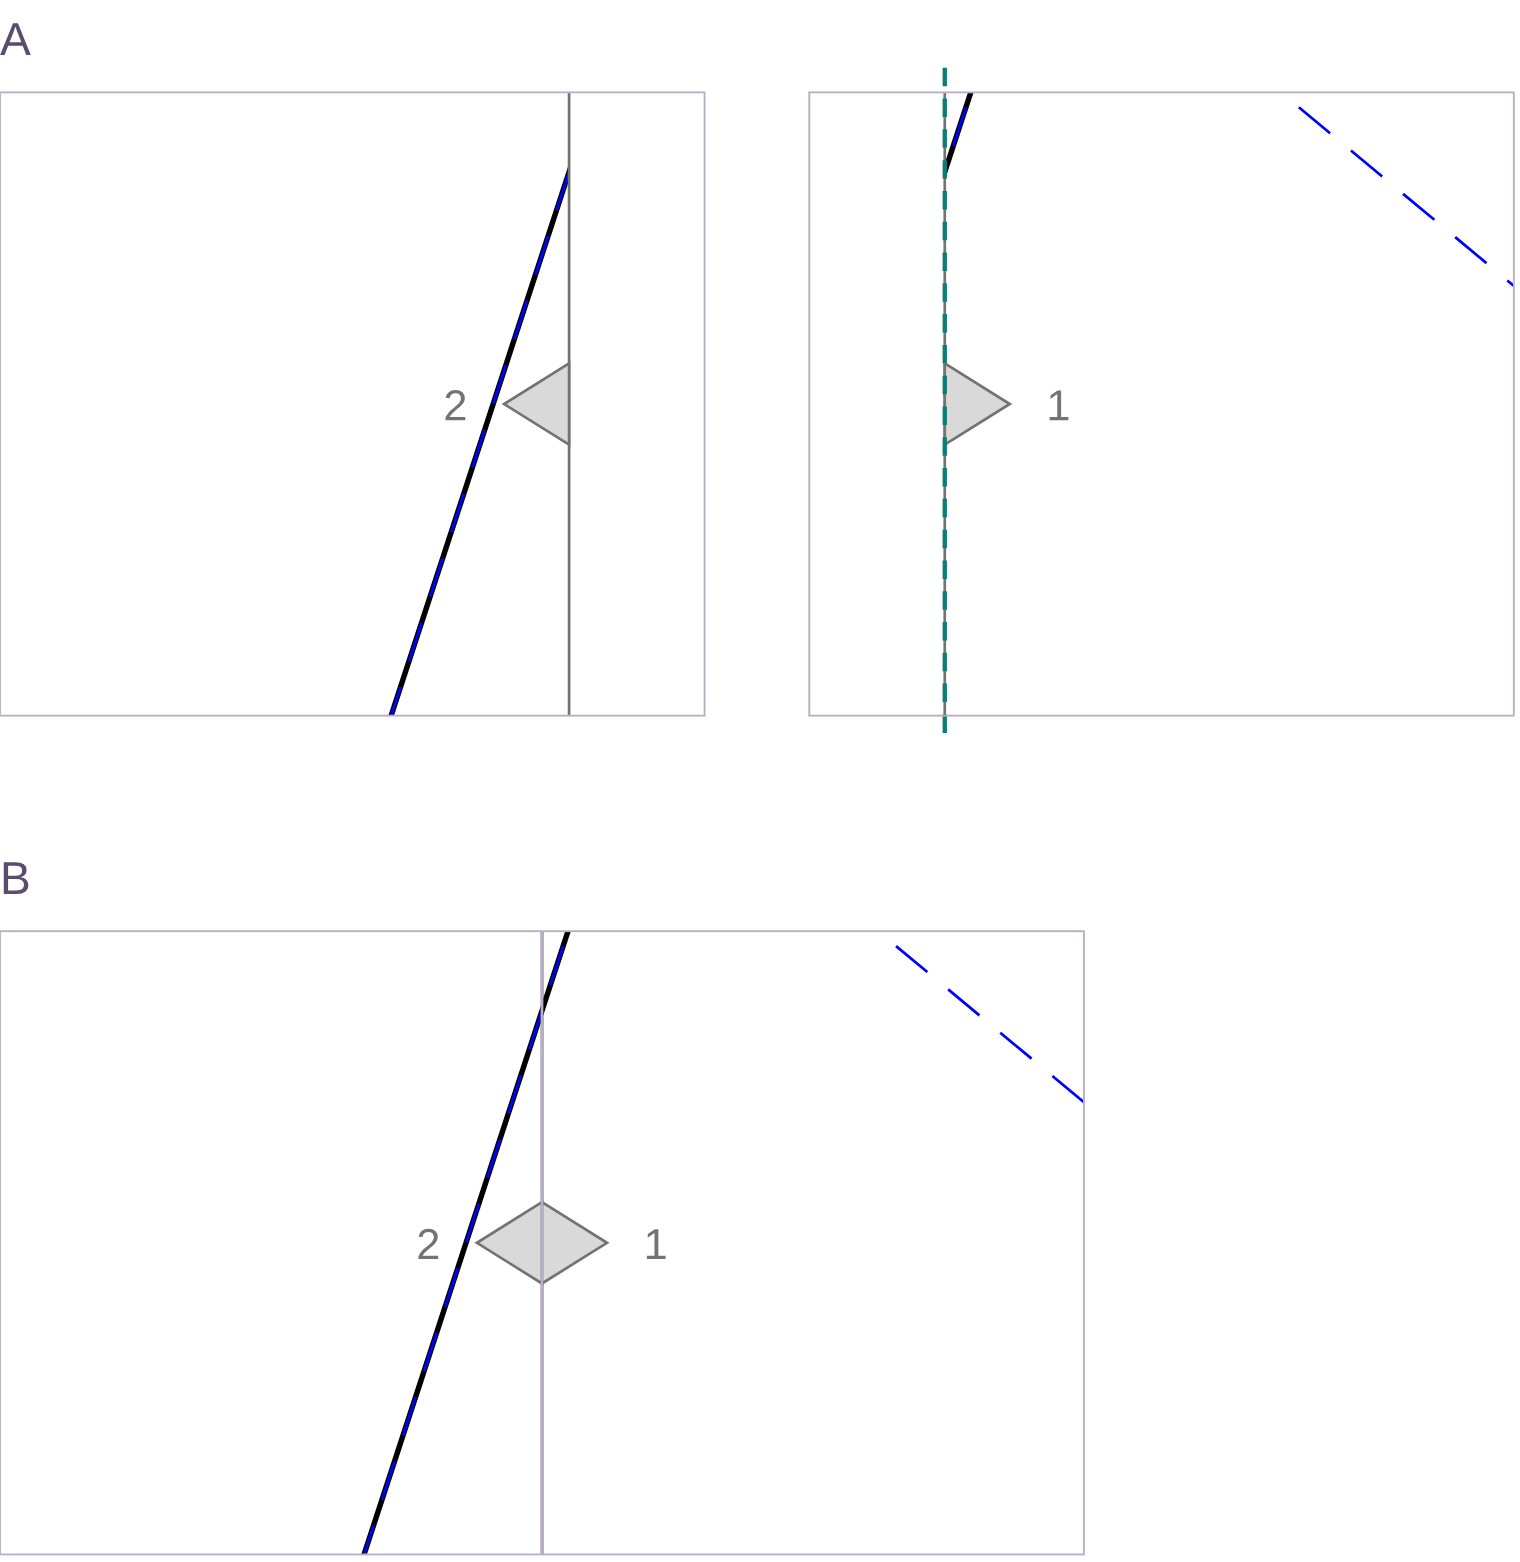
If the lines at the join are 1–2 mm apart, check that the margin is trimmed exactly along the frame and not beside it.
What is drawn on a piece
Go over the glued pattern or cut it straight out along the solid line. Here is what is on it:
- Cutting line — solid. Both the paper pattern piece and the fabric are cut along it. The seam allowances are already included.
- Seam line — dashed. Stitching runs along it.
- Seam allowance — the band between the cutting line and the seam line. Its width differs on different edges, and the generator writes it on each piece and on the first sheet, for example “allowances included: seams 1.5, armhole 1, neckline 0.7, hem 3, darts 0 cm”.
- Notch — a short line across the edge. On fabric it is marked with a snip of 3–5 mm or with chalk, and when sewing it is matched with the notch of another piece, for example the sleeve with the armhole.
- Darts — their legs meet at one point. A shoulder dart runs out to the edge; a waist dart lies inside the piece in a diamond shape.
- Grainline — an arrow. When cutting, it is laid parallel to the selvage of the fabric.
If a piece is cut on a fold of the fabric, its edge is marked with a dash-dot line labelled “fold”. This edge goes exactly on the fold of the folded fabric; it has no seam allowance.
Each piece has its name, its size, the number of pieces to cut and the direction of the grainline written inside it.
Print shop and plotter
If gluing twenty sheets is not appealing, the pattern can be printed on large sheets at a print shop. In the “Pieces for printing” window choose:
- A1 or A0 — there will be several sheets; glue them the same way, along the frames;
- “Plotter roll” and the roll width in millimetres (ask the print shop; often 594 or 914 mm);
- “One sheet, not split” — all the pieces in a row on one large sheet.
Tell the operator: “Print at 100% scale, no fitting to size.” Check the 15 × 15 cm corner ruler on the printout straight away, before you leave the print shop.
Check yourself
- Both scales of the corner ruler on the first sheet are exactly 15 cm.
- The 5 cm scale bar on sheets from the middle of the stack is also 5 cm.
- At each join the triangles form a diamond, and the lines continue without steps.
- Each piece has a name, a size and a grainline.